If you’re an app developer, You’ll actually spend days developing your Android App, if it’s a game, social networking app, or tutorial, and now you can publish your app on Google Play Store. So, you need to do something to launch the app through the Google Play Store. You may publish the application on a platform of more than 1 billion active Android users via this guide.
Convert Your Website To App – AndroidiOSAndroid & iOS
Requirements for Publish App on Google Play Store
See other applications previously released before you launch your android app on the play store.
To achieve so, you need to build a system and obtain what you need to deliver a successful mobile app.
- Google Play Publisher Account: You can publish the app and its information using the Google Play Publisher Account.
- Signed APK of your app: Required Signed APK, since Android wants to digitally sign all the APK files with a certificate that you are uploading to the play store.
- App Icon: The app icon should be in 512 x 512 32-bit formats, the file type must be PNG, and other formats won’t be allowed to upload on the App Store.
- Feature Graphic: It accepts the size of 1024 x 500 JPEG or 24-bit PNG without alpha.
The play store needs at least two screenshots of your mobile app from the mobile or tablet, and the images should be on JPEG, or the same as with your Feature Graphic, 24 via PNG without alpha. For Tablet, the screenshots should be from 7 and 10-inch tablets if required. The min length for any side is 320 px and the maximum height is 3840 px. - Short and Elaborate Description of your mobile app.
Steps to be followed to publish an Android App on Google Play Store
After accumulating all the requirements for the android mobile application, you can carry on by following the below steps which will publish your mobile app without any delay.
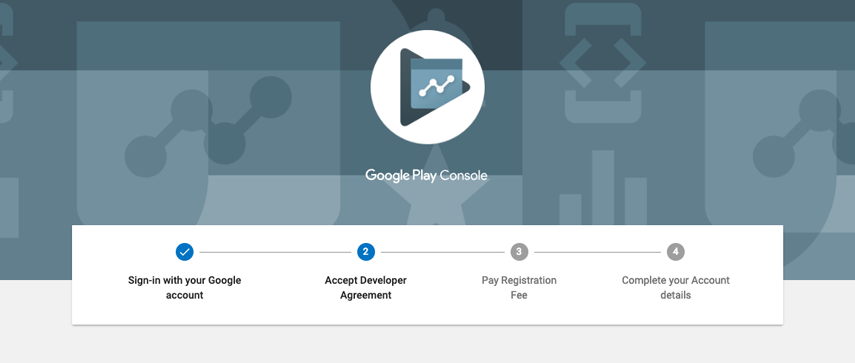
Google Developer Account
To publish the mobile app on the Google Play Store, the primary step is to create the Google Developer Account.
The registering fee for a Google Developer Account is $25. After completing the payment then it can only go further by reviewing and accepting Google’s Developer Distribution Agreement. You can do the payment process, using your Debit or Credit Card.
Once the payment is completed and you have to fill in each required information on your account, which includes your name as a developer which your Customers will be able to see on the play store. After this, you have to pause for two days before the registration is processed. In case you missed any details, you could add them later.
Links the Developer Account to the Merchant Account
If your app is paid to use, or you are planning to sell something using your app as a freemium app, The Merchant Account is a payment center profile, which is now dominating the Google Play Store.
Then you need to create your Merchant Account, To create the Merchant Account :
- Access The Google Play Console.
- Go to “Download Reports,” and “Financial.”
- Click set up your merchant account.
- Enter all the information about your business.
Once you are complete your profile, your Google developer account will be linked to your Merchant Account automatically. This Merchant Account allows managing from app sales to payouts on your account. In addition, you’ll be able to access your reports from sales through the Google Play Developer Console.
Create an App
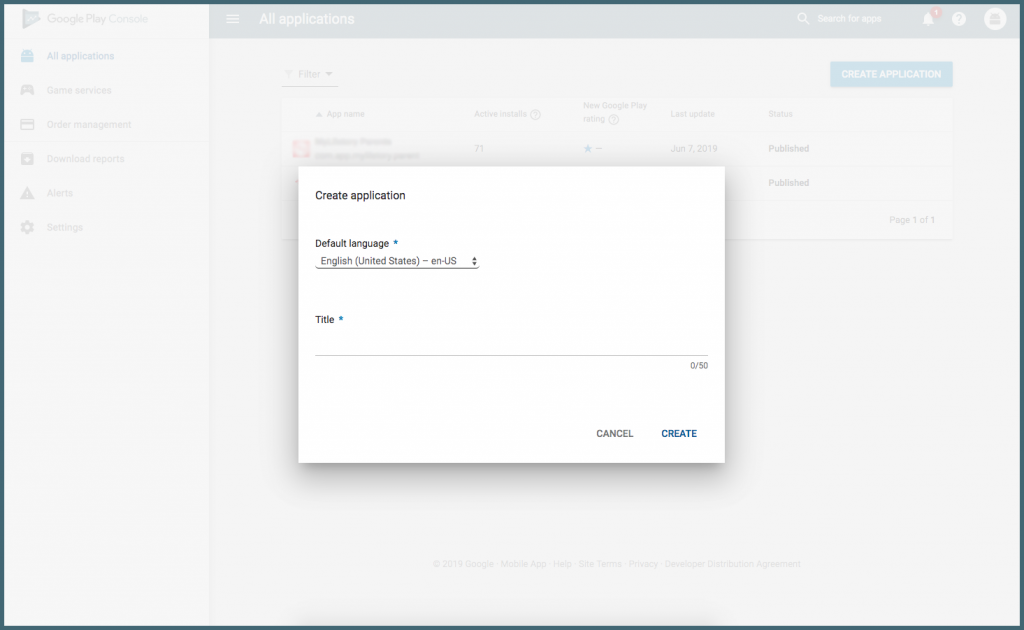
Once creating and setting up the Developer Play Console, you can able to add your mobile app by following the below steps:
- Go to ‘All applications’.
- Click on ‘Create Application.
- Click the default language for your android app from a drop-down list.
- Enter your mobile app’s title.
- Click “Create”.
The app’s title shows on Google Play once you publishing the app, after publishing you can able to change and update the name for your app.
Once you have created your app, on the entry page for the store, you have to provide all the information needed to list your app on the store.
Preparing Store Listing
Once the android mobile app has been created, you must start looking for the details on the store listing. How your app looks in the Play store, which plays a significant role in the number of users who react to it.
Note that with this step, you should save the draft and coming back to it later as this step will not need to proceed to the next.
Store Listing has at least six categories, which include product details, graphic assets, languages and translations, categorization, contact details, and privacy policy.
Product Details
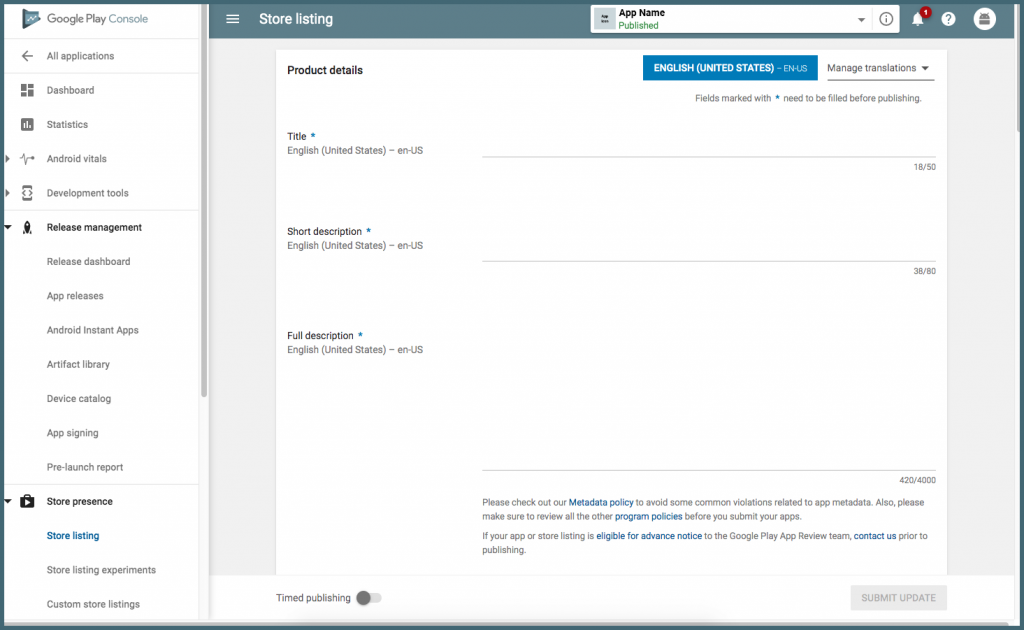
The next stage is to enter the details into three areas. This is where you can explain your product
Title: Title is the App name on the play store, it should not exceed 50 Characters, and it accepts only one localized title per language.
Short Description: It is the first text to be seen on your app’s detail page on the Play Store app. It has a maximum limit of 80 characters.
Full Description: Users can enlarge the short description to view the app’s full description; It has a maximum character limit of 4,000.
If you wanted your app to have a high performance in the Play Store, you should write your title and description with your user’s experience as a priority. Using the right keywords on the app title and description, you can get the user’s attention. And the app shouldn’t look like junk or promotion, for it can be suspended by the Play Store.
Graphic Assets
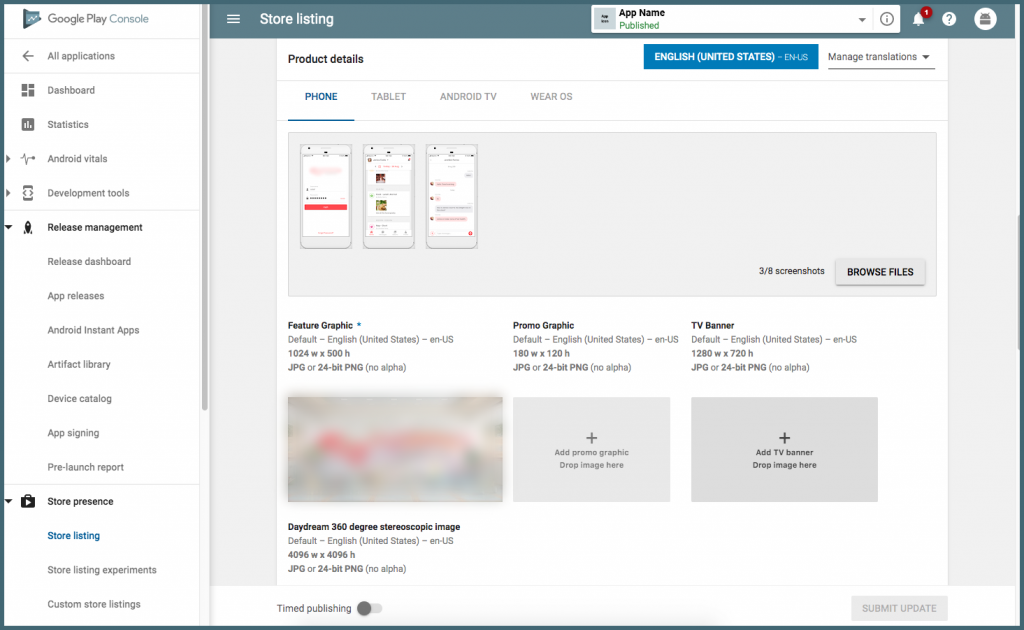
Graphic assets are all the media content that you add to your app page. From there, you can add screenshots and videos to promotional graphics, that define your app’s features and its functionality.
There are some significant things on the graphics assets, such as images, feature graphics, or an icon with high resolution. These are optional, but having them on your app will be seen as more attractive to the users.
Each asset will have its separate requirements, such as formatting or its dimensions, like the App icon, it needs a size of 512 x 512 with a 32-bit PNG format, and the Feature images should have a size of 1024 x 500 JEPG format or a 24-bit PNG without alpha.
Languages and Translations
You can set up your languages and translations, so that you can add a translation for the information relevant to your app on the listing details, which combined with screenshots in-language and other localized images.
Google also offers its users the option to translate the information from your app automatically.
Categorization
If you are going to publish the health care app or task-helper app, or a game. It is necessary to set the category for your app. Choose the category and type that belongs to your app. You can easily select the category of an app from a drop-down menu.
Choose the appropriate category for your app, If you want to give a rating for your app, you can add a content rating. Then you will have to submit an APK first and feel free to skip this for now.
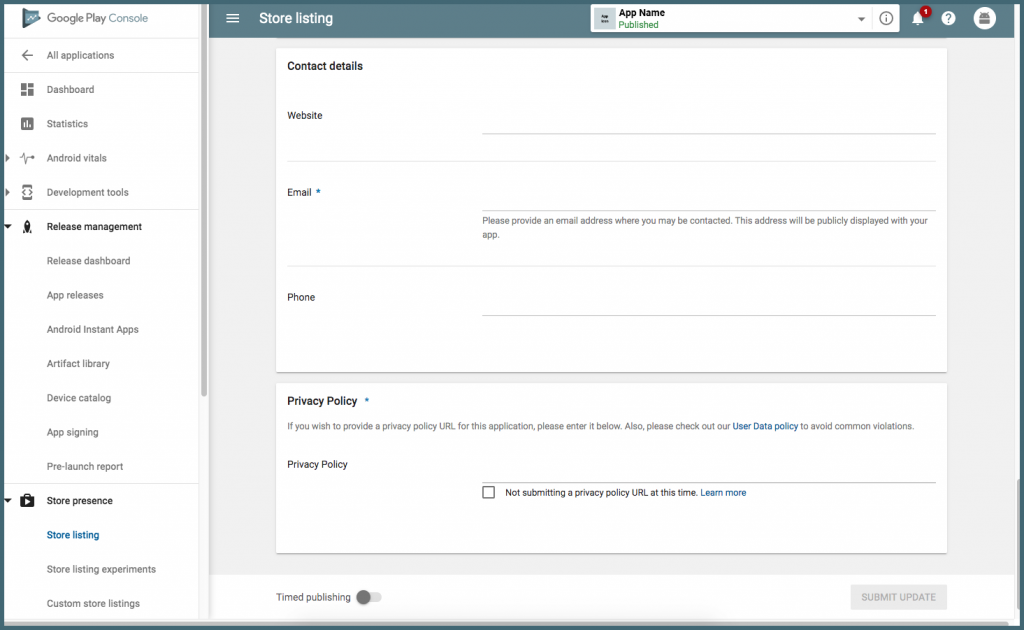
Contact Details
You can add your contact details to offer customer support for your app.
In this, you can add several channels for contact, allowing your customers to reach you from your email address, your website, and your mobile number.
Privacy Policy
Some apps are likely to ask for access to user data and permissions which may be sensitive. Make sure you enter a privacy policy that effectively explains how your app collects the information and how it uses it. And it requires you to attach a link to the privacy policy provided in the store listing to your app, to make sure it is working properly.
Once you complete the store listing step, you can then click the ‘Save Draft’ button for saving your details. In case you skipped some steps, you can able to return to them before publishing your app.
Uploading APK to Release Your App
It is the most important stage from uploading an app to the Google Play Store. The APK is the format that Android OS uses. It has the elements that your app needs to work on any device properly.
Google has a number of ways to upload your APK to publish, but before that, you have to create an app release, which only needs you to select the app created in the third step, and on the menu, locate the “Release Management” and then “App Releases.”
On App releases, you’ll be able to select how you want your app to be released, from close testing to public release. It helps if you want a close base to test your app first.
Provide Right Content Rating

Providing the rating appropriate for your app is quite important if you don’t want to have an “unrated” app listed in your play store since they are most probable to get removed from the store.
Google Play presents you with a rating questionnaire for you to fill out. Make sure the information is accurate since misreading or wrong interpretation could lead your app to be suspended from the Play Store.
Set Up Pricing And Distribution
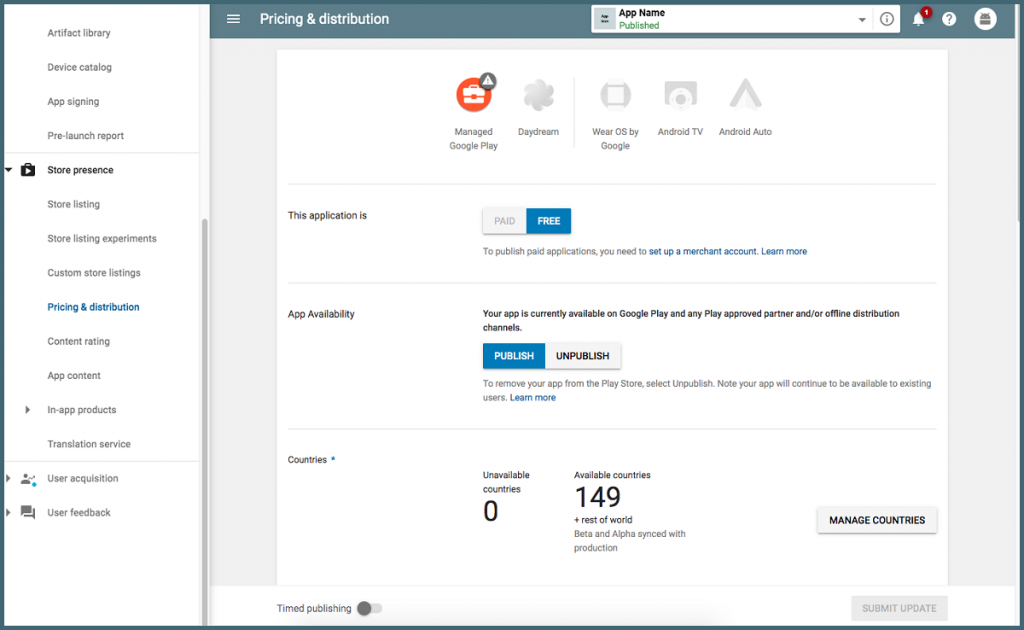
After you know how to monetize your app, you may continue to set it up as paid or free.
Note: You always have the chance to turn a paid app into a free one, but not the other way around; for this, you’ll need to create a brand new app and then price it.
Rollout Release: Publishing Your App
Once you are complete all the above steps, the final step will be reviewing and publishing your app. Once everything is clear. Click on “Review”, which will get you to “Review and rollout release”, where you will see and correct if any issues that may have missed your attention. Click on “Confirm rollout” which will send your app to the listings for all users in the countries you targeted.
If you are you planning to publish your Android mobile application on the Google Play Store? We can do it for you, We have aided to publish thousands of apps on the Google Play store.
Visited 2017 times, 1 Visit today